Jaunt Webscraping Tutorial - Quickstart
The Jaunt package contains the class UserAgent, which represents a headless browser. When the UserAgent loads an HTML or XML page, it creates a Document object.
The Document object exposes the content as a tree of Nodes, such as Element objects, Text objects, and Comment objects. For example, an HTML document has the following tree structure: it begins with the <html> Element, who's child nodes are <head> and <body> Elements. Each Element contains zero
or more attributes (such as <body class='foo'>) and zero or more child Nodes. The children can be Text Nodes, Comment Nodes, or other Elements.
When creating the Document, the UserAgent may encounter malformed HTML/XML. The parser automatically corrects malformed tags and converts relative urls to absolute urls but does not otherwise alter the document structure.
In addition to exposing the DOM, the Document also provides high-level utility classes for webscraping. For example, the class Form and Table provide convenience methods for submitting forms and extracting data from tables. For lower-level, work, the UserAgent provides access to HTTP Requests and Responses and the ability to manage cookies.
To begin using Jaunt, download and extract the zip file. The zip file contains the licensing agreement, javadocs documentation, example files, release notes, and a jar file (Java 1.6). Include the jar file in your classpath/project, at which point you will be able to recompile and/or run the example files. If your IDE supports it, configure javadoc integration (eg, in your Eclipse project, configure java build path, expand the entry for the jar file, select the path to the javadocs folder).
try{
  UserAgent userAgent = new UserAgent();                       //create new userAgent (headless browser).
  userAgent.visit("http://oracle.com");                        //visit a url
  System.out.println(userAgent.doc.innerHTML());               //print the document as HTML
}
catch(JauntException e){         //if an HTTP/connection error occurs, handle JauntException.
  System.err.println(e);
}
When the userAgent visits a url (line 3), it creates a Document object (userAgent.doc) to represent the parsed content, whether it's HTML, XHTML, or XML.
On line 4, the document content is printed as HTML. In order to print the document as XML instead, the method innerXML() can be called. Malformed tags and/or missing closing tags are automatically corrected, so the printed output may not be identical to the original/unparsed content. The UserAgent method getSource() provides the original/unaltered source.
try{
  UserAgent userAgent = new UserAgent();                       //create new userAgent (headless browser).
  System.out.println("SETTINGS:\n" + userAgent.settings);      //print the userAgent's default settings.
  userAgent.settings.autoSaveAsHTML = true;                    //change settings to autosave last visited page.

  userAgent.visit("http://oracle.com");                        //visit a url.
  String title = userAgent.doc.findFirst("<title>").getChildText(); //get child text of title element.
  System.out.println("\nOracle's website title: " + title);    //print the title

  userAgent.visit("http://amazon.com");                        //visit another url.
  title = userAgent.doc.findFirst("<title>").getChildText();   //get child text of title element.
  System.out.println("\nAmazon's website title: " + title);    //print the title
}
catch(JauntException e){   //if title element isn't found or HTTP/connection error occurs, handle JauntException.
  System.err.println(e);
}
On line 4 autosaving is enabled, which means that anytime a page is visited it will be autosaved as LAST_VISITED.html in the directory specified by settings.outputPath. The related setting autoSaveAsXML can be used to save the document in XML format rather than HTML. Autosaving is useful in development and debugging, since LAST_VISITED.html can be checked with Chrome/Firefox/etc to examine the DOM structure. See UserAgentSettings for all the settings of a UserAgent.
The document's findFirst(String) method (lines 7 and 11) accepts a tagQuery that (in simple cases) resembles an HTML tag, and searches the document tree until it finds a matching element. It should be noted that the query "<title>" will match any Element who's tagname is title (case insensitive), whether or not the element has additional attributes. As we'll see in later examples, the tagname portion of the query is actually a regular expression,
which provides a powerful syntax for pattern matching. For example, the query "<h(1|2)>" would match any h1 or h2 tag. Example 11 provides a full account of the tagQuery syntax.
Note that in this example we catch JauntException, which is the superclass of all other Jaunt-related Exceptions. Later examples will demonstrate handling HTTP/connection errors separately from search-related errors.
try{
  UserAgent userAgent = new UserAgent();
  //open HTML from a String.
  userAgent.openContent("<html><body>WebPage <div>Hobbies:<p>beer<p>skiing</div> Copyright 2013</body></html>");
  Element body = userAgent.doc.findFirst("<body>");
  Element div = body.findFirst("<div>");

  System.out.println("body's childtext: " + body.getChildText());   //join child text of body element
  System.out.println("-----------");
  System.out.println("all body's text: " + body.getTextContent());  //join all text within body element
  System.out.println("-----------");
  System.out.println("div's child text: " + div.getChildText());    //join child text of div element
  System.out.println("-----------");
  System.out.println("all div's text: " + div.getTextContent());    //join all text within the div element
}
catch(JauntException e){
  System.err.println(e);
}
On line 6 we see that the findFirst(String) method can be invoked on an Element (or the Document as on the previous line). When invoked on an Element, the search is restricted to that Element's descendants. The findFirst(String) method actually belongs to the class Element, and is inherited by Document.
On lines 8 - 14 we see that the getChildText() method returns a String concatenation (joining) of the text children of the element, whereas the getTextContent() method returns a String concatenation of all Text descendants. If an element does not contain any text, either method will return an empty String.
The variation getTextContent(String, boolean, boolean) accepts additional parameters for inserting a delimeter between concatenated texts, specifying whether to exclude script tag text, and/or indicating whether HTML/XHTML entity references within the text should be replaced with their character equivalents (eg converting & to &).
try{
  UserAgent userAgent = new UserAgent();
  userAgent.visit("http://intel.com");

  Element anchor = userAgent.doc.findFirst("<a href>");            //find 1st anchor element with href attribute
  System.out.println("anchor element: " + anchor);                 //print the anchor element
  System.out.println("anchor's tagname: " + anchor.getName());     //print the anchor's tagname
  System.out.println("anchor's href attribute: " + anchor.getAt("href"));  //print the anchor's href attribute
  System.out.println("anchor's parent Element: " + anchor.getParent());    //print the anchor's parent element

  Element meta = userAgent.doc.findFirst("<head>").findFirst("<meta>");    //find 1st meta element in head section
  System.out.println("meta element: " + meta);                     //print the meta element
  System.out.println("meta's tagname: " + meta.getName());         //print the meta's tagname
  System.out.println("meta's content attribute: " + meta.getAt("content"));//print the meta's content attribute
  System.out.println("meta's parent Element: " + meta.getParent());        //print the meta's parent element
}
catch(JauntException e){
  System.err.println(e);
}
The tagQuery <a href> on line 5 specifies not only the tagname but also that the Element must contain an href attribute. As previously noted, the tagname portion of the query is a regular expression. The attributename, however, is not; it is matched as a case-insensitive String.
On lines 6, 9, 12 and 16, an Element's toString() method is implicity called, which returns a String representation of the Element excluding its children. See Example 5 for how to obtain a String representation of an Element that does include its children.
On line 8, the getAt(String) method is called to retrieve the attribute value associated with the (case insensitive) attribute name href. If the anchor tag did not have an href attribute, calling getAt(String) would throw a NotFound Exception. The related method getAtString(String) differs in that it returns an empty String rather than throwing a NotFound Exception if the attribute value does not exist (not shown).
An example of chaining search methods can be seen on line 11, where the document is searched for the first head Element, which is subsequently searched for the first meta Element. In this case, the same result would be obtained by simply calling
userAgent.doc.findFirst("<meta>"). However the latter search would be slower if no meta tag was present, since it would search the entire document rather than only searching the head section.
<html>
   <div class='colors'>redgreen</div>
   <p>visit again soon!</p>
</html>
try{
  UserAgent userAgent = new UserAgent();
  userAgent.open(new File("path/to/colors.htm"));  //open the HTML (or XML) from a file

  Element div = userAgent.doc.findFirst("<div class=images>");  //find first div who's class matches 'images'
  System.out.println("div's outerHTML():\n" + div.outerHTML());
  System.out.println("-------------");
  System.out.println("div's innerHTML():\n" + div.innerHTML());
  System.out.println("-------------");
  System.out.println("div's outerXML(2):\n" + div.outerXML(2)); //2 extra spaces used per indent
  System.out.println("-------------");
  System.out.println("div's innerXML(2):\n" + div.innerXML(2)); //2 extra spaces used per indent
  System.out.println("-------------");

  //make some changes
  div.innerHTML("<h1>Presto!</h1>");          //replace div's content with different elements.
  System.out.println("Altered document as HTML:\n" + userAgent.doc.innerHTML());  //print the altered document.
}
catch(JauntException e){
   System.err.println(e);
}
The query used on line 5 can be read as "find the first element which has a tagname that matches the case-insensitive regular expression div and which has an attribute who's name matches the case-insensitive String class, where the value of the attribute matches the case-insensitive regular expression images. Note that on line 5, the attribute value within the query is unquoted and that quotes are optional.
Because the DOM represents HTML and XML using the same internal model, switching between the two when printing is a matter of output formatting. When using the indenting options (ie outerHTML(int) and outerXML(int)), whitespace characters are added to the output string in order to indent each node (including existing whitespace nodes); so this indending whitespace will appear in addition to any that was already present.
The interchangeabiliy between HTML and XML is also seen in the methods that require HTML or XML input, such as innerHTML(String) on line 16; such methods accept either format.
try{
  UserAgent userAgent = new UserAgent();
  userAgent.visit("http://oracle.com");
  System.out.println("Response:\n" + userAgent.response);  //print response data
}
catch(ResponseException e){                                //catch HTTP/Connection error
  HttpResponse response = e.getResponse();                 //or check userAgent.response
  if(response != null){                                    //print response data field by field
    System.err.println("Requested url: " + response.getRequestedUrlMsg()); //print the requested url
    System.err.println("HTTP error code: " + response.getStatus());        //print HTTP error code
    System.err.println("Error message: " + response.getMessage());         //print HTTP status message
  }
  else{
    System.out.println("Connection error, no response!");
  }
}
userAgent.response) contains information about the webserver response. If no error occurs, UserAgent.response can be examined for details regarding the response, as on line 4.
If the connection fails or an HTTP error occurs, the UserAgent.visit(String) method will throw a ResponseException. The ResponseException also contains a reference to the response, however in this case it's possble that the response is null (indicating that no response was received due to a connection error). Since the response object could be null, that possility is checked on line 8 before invoking any of its methods for the printing steps. A simpler alternative would be to simply print the ResponseException e, which would show the same (and more) information (see next Example).
In some cases, a webserver response will redirect the UserAgent to visit another url. In the case of a sequence of redirected requests and responses, userAgent.response represents the most recent response in the chain.
try{
  UserAgent userAgent = new UserAgent();  //find the first anchor having href, get href value (below)
  String firstAnchorUrl = userAgent.visit("http://amazon.com").findFirst("<a href>").getAt("href");
  userAgent.visit(firstAnchorUrl);                              //visit url
  System.out.println("location:" + userAgent.getLocation());    //print the current location (url).
}
catch(SearchException e){        //if an element or attribute isn't found, catch the exception.
  System.err.println(e);         //printing exception shows details regarding origin of error
}
catch(ResponseException e){      //in case of HTTP/Connection error, catch ResponseExeption
  System.err.println(e);         //printing exception shows HTTP error information or connection error
}
http://amazon.com, searches for the first anchor that has an href attribute, and then returns the href value. Note that these steps can be chained together because the visit(String) method returns the Document. When working with hyperlinks, it can also be useful to take advantage of Document's convenience methods, such as getHyperlink(String) and findAttributeValues(String query) (not shown).
On line 7, any search-related errors are caught, which in this case would be a possible NotFound Exception, which is a subclass of SearchException.
On line 10, any HTTP and connection-related errors are caught. The ResponseException itself is printed here, which automatically shows information regaring the HttpResponse (or lack thereof) that caused the problem.
try{
  UserAgent userAgent = new UserAgent();
  userAgent.visit("http://amazon.com");

  Elements tables = userAgent.doc.findEach("<table>");       //find non-nested tables
  System.out.println("Found " + tables.size() + " tables:");
  for(Element table : tables){                               //iterate through search results
    System.out.println(table.outerHTML() + "\n----\n");      //print each element and its contents
  }
}
catch(ResponseException e){
  System.out.println(e);
}
findEach(tagQuery) method.
On line 5, the findEach method is invoked on the document, so it walks the document tree searching for any Elements that match the query "<table>". Any such elements are returned in an Elements object, which is a container for search results. The defining feature of the findEach search is that it when it finds an element that matches the query, the does not search further into that element. So in this example, the findEach method only returns non-nested tables (ie, does not include tables that occur within other tables).
Class Elements has convenience methods that make the search results themselves easily searchable. The search methods are similar to those already covered in class Element (eg, findFirst, findEach, etc).
One benefit of class Elements itself being searchable is that it allows searches to be easily chained together. A good way of thinking about class Elements is as a <#elements> tag and each of its children is a single search result.
If the findEach(String) method does not locate any Elements that match the query, an empty Elements container is returned.
<html>
  <body>
    <div>vegetables</div>
    <div>fruits</div>
    <div class='meat'>
      Meats
      <div>chicken</div>
      <div>beef</div>
    </p>
    <div class='nut'>
      Nuts
      <div>peanuts</div>
      <div>walnuts</div>
    </div>
  </body>
</html>
try{
  UserAgent userAgent = new UserAgent();
  userAgent.visit("http://jaunt-api.com/examples/food.htm");

  Elements elements = userAgent.doc.findEvery("<div>");             //find all divs in the document
  System.out.println("Every div: " + elements.size() + " results"); //report number of search results.

  elements = userAgent.doc.findEach("<div>");                       //find all non-nested divs
  System.out.println("Each div: " + elements.size() + " results");  //report number of search results.
                                                                    //find non-nested divs within <p class='meat'>
  elements = userAgent.doc.findFirst("<div class=meat>").findEach("<div>");
  System.out.println("Meat search: " + elements.size() + " results");//report number of search results.
}
catch(JauntException e){
  System.err.println(e);
}
findEvery method operates by examining all the descendants of an element (or of a document). Every Element that matchs the tagQuery is added to the Elements container, which is returned by the method. As discussed in the previous example, class Elements is a container for search results that is itself searchable.
On line 6, The findEvery search is invoked on the document, so it retrieves every div Element in the document (eight divs). The findEach(String) method (line 9) retrieves only four divs, since it will not find the nested divs. The last findEach method (line 12) is not invoked on the document object but rather on a particular Element. It retrieves the three divs that are children of <div class='meat'>.
As with the findEach method, if the findEvery method does not find any Elements that match the tagQuery, an empty <#elements> container is returned (no Exception is thrown).
<html>
  <body>
    <div>vegetables</div>
    <div>fruits</div>
    <div class='meat'>
      Meats
      <div>chicken</div>
      <div>beef</div>
    </p>
    <div class='nut'>
      Nuts
      <div>peanuts</div>
      <div>walnuts</div>
    </div>
  </body>
</html>
try{
  UserAgent userAgent = new UserAgent();
  userAgent.visit("http://jaunt-api.com/examples/food.htm");

  Element body = userAgent.doc.findFirst("<body>");                    //find body element
  Element element = body.getElement(2);                                //retrieve 3rd child element within the body.
  System.out.println("result1: " + element);                           //print the element

  String text = body.getElement(3).getElement(0).getChildText();       //get text of 1st child of 4th child of body.
  System.out.println("result2: " + text);                              //print the text

  element = body.findFirst("<div class=meat>").getElement(1);          //retrieve 2nd child element of div
  System.out.println("result3: " + element.outerHTML());               //print the element and its content

  Elements elements = body.getEach("<div>");                           //get body's child divs
  System.out.println("result4 has " + elements.size() + " divs:\n");   //print the search results
  System.out.println(elements.innerHTML(2));                           //print elements, indenting by 2
}
catch(JauntException e){
  System.err.println(e);
}
The getElement(int) method on line 6 retrieves the first child of the body element. On line 9, several getElement(int) methods are chained together to create a path to the <div>peanut</div> element. On lines 12-13 a similar technique is used to retrieve and print <div>beef</div>. On line 15 the getEach(String) method searches the child elements of <body> for div elements. The results of the search (four divs) are then printed. When reviewing the output, remember that each child of <#elements> constitutes a single search result.
| First | Each | Every | ||
|---|---|---|---|---|
| get | getFirst(String query) | getEach(String query) | -- | searches children only |
| find | findFirst(String query) | findEach(String query) | findEvery(String query) | searches children/descendants to any depth |
| searches for first Element that matches the query, returns Element or throws NotFound | searches for matching, non-nested Elements, which are returned in Elements container. | searches for all matching Elements, which are returned in Elements container. |
<html>
  <body>
    <p id='1'>hi</p>
    <span id='2'>bonjour</span>
    <div id='3'>hola</div>
    <p id='4'>ahoj</p>
  </body>
</html>
      UserAgent userAgent = new UserAgent();
      userAgent.visit("http://jaunt-api.com/examples/hello.htm");

      Elements elements = userAgent.doc.findEvery("<div|span>");//find every element who's tagname is div or span.
      System.out.println("results1:\n" + elements.innerHTML()); //print the search results

      elements = userAgent.doc.findEvery("<p id=1|4>");         //find every p element who's id is 1 or 4
      System.out.println("results2:\n" + elements.innerHTML()); //print the search results

      elements = userAgent.doc.findEvery("< id=[2-6]>");        //find every element (any name) with id from 2-6
      System.out.println("results3:\n" + elements.innerHTML()); //print the search results

      elements = userAgent.doc.findEvery("<p>ho");        //find every p who's joined child text contains 'ho' (regex)
      System.out.println("results4:\n" + elements.innerHTML()); //print the search results

	  elements = userAgent.doc.findEvery("<p|div>^ho");   //find every p or div who's child text starts with 'ho'
      System.out.println("results5:\n" + elements.innerHTML()); //print the search result

      elements = userAgent.doc.findEvery("<p>^(hi|ahoj)");//find every p who's child text starts with 'hi' or 'ahoy'
      System.out.println("results6:\n" + elements.innerHTML()); //print the search result
<tagnameRegex attributeName='attributeValueRegex'>childTextRegex- tagnameRegex:
- If tagnameRegex is a whitespace character, it will match any tagname. Otherwise, the tagnameRegex will be treated as case-insensitive and be evaluated against entire tagnames (ie will not match substrings). The tagnameRegex must begin with either an alphabetical character or a round opening bracket, and may not contain whitespace (though it may contain \\s, which matches whitespace)
- attributeName:
- If no attributes are included in the query, the query will match any attributes in a candidate element (including one without attributes). Otherwise, the attributeName in the query is matched as a case-insensitive string, not as a regular expression.
- attributeValueRegex:
- If attributeValueRegex is not present, the attributeName in the query will be matched against candidate attributeNames irrespective of their attributeValues. If attributeValueRegex is present, it will be treated as case-insensitive and be evaluated against the entire corresponding attribute value (ie will not match substrings).
- childTextRegex:
- If childTextRegex is not present, the query will match any child text (including lack of text). Otherwise, childTextRegex will be evaluated against the concatenation of Text children of the Element. It's important to note that the childTextRegex is case sensitive and will match against substrings.
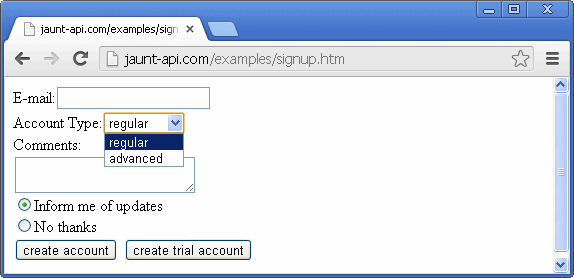
    try{
      UserAgent userAgent = new UserAgent();
      userAgent.visit("http://jaunt-api.com/examples/signup.htm");

      userAgent.doc.apply(     //fill-out the form by applying a sequence of inputs
        "tom@mail.com",        //string input is applied to textfield
        "(advanced)",          //bracketed string (regular expression) selects a menu item
        "no comment",          //string input is applied to textarea
        1                      //integer specifies index of radiobutton choice
      );
      userAgent.doc.submit("create trial account"); //press the submit button labelled 'create trial account'
      System.out.println(userAgent.getLocation());  //print the current location (url)
    }
    catch(JauntException e){
      System.out.println(e);
    }
On lines 6-8, the apply(Object ... args) method of the document is called, which can be used for filling-out any sequence of editable textfields, password fields, textareas, radiobuttons, checkboxes, menus, or file upload dialogues. In this case, the sequence of inputs has the following effect: it fills-out the textfield with tom@mail.com, selects the menu option that matches the regular expression (advanced), fills-out the textarea with the text no comment, and finally selects the radiobutton at index 1 (ie, the second radiobutton). Although not shown in this example, boolean values (true/false) can be used to check/uncheck checkboxes, the string "\t" can be used to skip the next field, and a File object can be used to specify a file for file-upload buttons. On line 11, the submit button is pressed, which submits the form that was filled out and on line 12, the url of the followup page is printed, using getLocation().
It is worth noting that Form objects also have their own apply(Object ... args) method. So in a similar fashion, a sequence of inputs can be applied to a specific form (ie, not necessarily the first one).
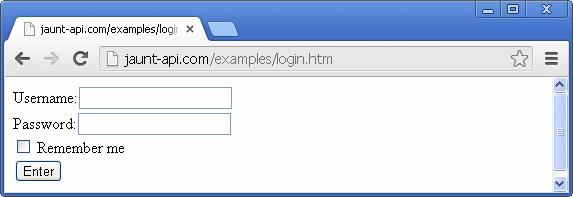
try{
  UserAgent userAgent = new UserAgent();
  userAgent.visit("http://jaunt-api.com/examples/login.htm");

  userAgent.doc.filloutField("Username:", "tom");          //fill the field labelled 'Username:' with "tom"
  userAgent.doc.filloutField("Password:", "secret");       //fill the field labelled 'Password:' with "secret"
  userAgent.doc.chooseCheckBox("Remember me", Label.RIGHT);//choose the component right-labelled 'Remember me'
  userAgent.doc.submit();                                  //submit the form
  System.out.println(userAgent.getLocation());             //print the current location (url)
}
catch(JauntException e){
  System.err.println(e);
}
apply(Obect ... args) (see previous example) can be called to continue filling out the next/remaining fields, whether or not they are labelled.
On lines 5 and 6, the filloutField(String, String) method of the document is called, which is used for filling out textfields, password fields, and textarea fields. The first argument is a case-insensitive and spacing-insensitive String used to match the text label to the left of the fields. The second argument is the value to be entered into the field.
On line 7, the chooseCheckBox(short, String) method is called to check the checkboxe. The first parameter is a case-insensitive and spacing-insensitive String for matching the text of the label. The second parameter specifies the orientation of the label relative to the checkbox.
On line 8, the submit button is pressed, which submits the form. If there is more than one form on the page, the 'active' form is submitted. The active form is determined by the first field to be filled out. Once a particular form is active, attempting to fill out an input from a different form causes a NotFound Exception to be thrown. A MultipleFound Exception is thrown if the specified label text matches more than one label of the active form.
On line 9, the url of the followup page is printed, using getLocation().
try{  //same steps, using fluent method invokation
  UserAgent userAgent = new UserAgent();
  userAgent.visit("http://jaunt-api.com/examples/login.htm")
    .filloutField("Username:", "tom")
    .filloutField("Password:", "secret")
    .chooseCheckBox("Remember me", Label.RIGHT)
    .submit();
  System.out.println(userAgent.getLocation());
}
catch(JauntException e){
  System.err.println(e);
}
try{
  UserAgent userAgent = new UserAgent();
  userAgent.visit("http://jaunt-api.com/examples/signup.htm");
  Document doc = userAgent.doc;

  doc.filloutField("E-mail:", "tom@mail.com");     //fill out the (textfield) component labelled "E-mail:"
  doc.chooseMenuItem("Account Type:", "advanced"); //choose "advanced" from the menu labelled "Account Type:"
  doc.filloutField("Comments:", "no comment");     //fill out the (textarea) component labelled "Comments:"
  doc.chooseRadioButton("No thanks", Label.RIGHT); //choose the (radiobutton) component right-labelled "No thanks"
  doc.submit("create trial account");              //press the submit button labelled 'create trial account'
  System.out.println(userAgent.getLocation());     //print the current location (url)
}
catch(JauntException e){
  System.out.println(e);
}
The chooseMenuItem method (line 7) is used to select menu items or menulist items, though it does not support making multiple selections from a menulist. The filloutField method (lines 6 and 8) has been previously covered, though here we see it used with a texarea field. The chooseRadioButton method on line 9 is used to select a radio button.
On line 10, the form is submitted by specifying the label of the submit button (submit(String)). The functionality is important when the form has more than one submit button; otherwise, the method submit() would suffice. Specifying a label that does not match a submit button of the active form results in a NotFound Exception, which is a subclasses of JauntException (caught on line 18). As previously noted, the active form is the form targeted by the first fillout/choose/select operation.
<html>
Sign up:<br>
<form name="signup" action="http://jaunt-api.com/examples/signup2Response.htm">
  E-mail:<input type="text" name="email"><br>
  Password:<input type="password" name="pw"><br>
  Remember me <input type="checkbox" name="remember"><br>
  Account Type:<select name="account"><option>regular<option>advanced</select><br>
  Comments:<br><textarea name='comment'></textarea><br>
  <input type="radio" name="inform" value="yes" checked>Inform me of updates<br>
  <input type="radio" name="inform" value="no">No thanks<br>
  <input type="submit" name="action" value="create account">
  <input type="submit" name="action" value="create trial account">
</form>
</html>
try{
  UserAgent userAgent = new UserAgent();
  userAgent.visit("http://jaunt-api.com/examples/signup2.htm");

  Form form = userAgent.doc.getForm(0);       //get the document's first Form
  form.setTextField("email", "tom@mail.com"); //or form.set("email", "tom@mail.com");
  form.setPassword("pw", "secret");           //or form.set("pw", "secret");
  form.setCheckBox("remember", true);         //or form.set("remember", "on");
  form.setSelect("account", "advanced");      //or form.set("account", "advanced");
  form.setTextArea("comment", "no comment");  //or form.set("comment", "no comment");
  form.setRadio("inform", "no");              //or form.set("inform", "no");
  form.submit("create trial account");        //click the submit button labelled 'create trial account'
  System.out.println(userAgent.getLocation());//print the current location (url)
}
catch(JauntException e){
  System.err.println(e);
}
userAgent.doc.getForm("<form name=signup>").On lines 6-11, input field of various types are identified by their (case insensitive) names and filled out with specific values. The setSelect(String, String) operation on line 9 is used to set a dropdown menu or selection list to a single value, however it can be called more than once to make multiple selections in a selection list where multiple selections are enabled. All the methods for setting values by name throw a NotFound Exception if input field's name cannot be matched.
On line 12, the form object is submitted by specifying the label of the submit button (submit(String)). Specifying the submit button is important when the form has more than one or when the submit button contributes a name-value pair required by the application; otherwise, the method submit() would suffice.
<html>
<h1>Movie Search:</h1>
<form name="srch" action="http://jaunt-api.com/examples/searchResponse.htm">
  Movie Keyword:<input type="text" name="keyword"><br>
  Movie Genre:<select name="movieType"><option>Drama<option>Horror</select><br>
  Language:
  <input type='radio' name='lang' value='english'>English
  <input type='radio' name='lang' value='french'>French<br>
  <input type="submit" value="submit search">
</form>
</html>
UserAgent userAgent = new UserAgent();
userAgent.visit("http://jaunt-api.com/examples/search.htm");

Form form = userAgent.doc.getForm("<form name=srch>");            //retrieve Form object by its name.
form.addPermutationTarget("keyword", new String[]{"cat", "dog"}); //specify seach terms to permute thru
form.addPermutationTarget("movieType");            //specify that movietype field will be permuted (all values)
form.addPermutationTarget("lang");                 //specify that lang field will be permuted (all values)
List<HttpRequest> requests = form.getRequestPermutations();       //generate list of request permutations

System.out.println("request permutations:");
for(HttpRequest request : requests){               //print the list of request permutation
  System.out.println(request.asUrl());
}
On line 4, the Form object is retrieved by the form's name, and in the next three lines (5-7) permutation targets are added. Each permutation target identifies a specific form field (by its name) and defines all the possible values through which it should be permuted. In some cases, the possible values are by definition embedded as part of the component (such as menus, radiobuttons, and checkboxes). In other cases (such as texfields, password fields, and textareas) the permutation values need to be specified, since there are an unlimited number of possible inputs. In such cases the permutation values are provided in a String array, as on line 5, where the textfield is set to be permuted through the search terms 'cat' and 'dog'.
On lines 11-13, each generated HttpRequest is printed as a URL (see output below). The UserAgent can directly accept the HttpRequest objects, using UserAgent.send(HttpRequest).
For additional control, the form can be redefined at the DOM-level before defining permutation targets. For example, you may wish to remove the first entry of a dropdown menu, if it is simply a blank option, rather than have it generate a meaningless request permutation. Any DOM-level manipulatation must occur before the form is aquired through the document's getForm(String) method.
http://jaunt-api.com/examples/searchResponse.htm?keyword=cat&movieType=Drama&lang=english
http://jaunt-api.com/examples/searchResponse.htm?keyword=cat&movieType=Drama&lang=french
http://jaunt-api.com/examples/searchResponse.htm?keyword=cat&movieType=Horror&lang=english
http://jaunt-api.com/examples/searchResponse.htm?keyword=cat&movieType=Horror&lang=french
http://jaunt-api.com/examples/searchResponse.htm?keyword=dog&movieType=Drama&lang=english
http://jaunt-api.com/examples/searchResponse.htm?keyword=dog&movieType=Drama&lang=french
http://jaunt-api.com/examples/searchResponse.htm?keyword=dog&movieType=Horror&lang=english
http://jaunt-api.com/examples/searchResponse.htm?keyword=dog&movieType=Horror&lang=french
<html>
  <table class="stocks" border="1">
    <tr><td>MSFT</td><td>GOOG</td><td>APPL</td></tr>
    <tr><td>$31.58</td><td>$896.57</td><td>$465.25</td></tr>
  </table>
</html>
    try{
      UserAgent userAgent = new UserAgent();
      userAgent.visit("http://jaunt-api.com/examples/stocks.htm");

      Element table = userAgent.doc.findFirst("<table class=stocks>");  //find table element
      Elements tds = table.findEach("<td|th>");                         //find non-nested td/th elements
      for(Element td: tds){                                             //iterate through td/th's
        System.out.println(td.outerHTML());                             //print each td/th element
      }
    }
    catch(JauntException e){
      System.err.println(e);
    }
findEach(String) method is used to collect every non-nested td/th descendant of the table element (line 6). The parameter "<td|th>" is a query that uses the regular expression td|th to match the tagname.
try{
  UserAgent userAgent = new UserAgent();
  userAgent.visit("http://jaunt-api.com/examples/schedule.htm");
  Element tableElement = userAgent.doc.findFirst("<table class=schedule>");   //find table Element
  Table table = new Table(tableElement);                   //create Table component

  System.out.println("\nText of first column:");
  List<String> results = table.getTextFromColumn(0);       //get text from first column
  for(String text : results) System.out.println(text);     //iterate through results & print

  System.out.println("\nText of column containing 'Mon':");
  results = table.getTextFromColumn("Mon");                //get text from column containing 'Mon'
  for(String text : results) System.out.println(text);     //iterate through results & print

  System.out.println("\nText of first row:");
  results = table.getTextFromRow(0);                       //get text from first row
  for(String text : results) System.out.println(text);     //iterate through results & print

  System.out.println("\nText of row containing '2:00pm':");
  results = table.getTextFromRow("2:00pm");                //get text from row containing '2:00pm'
  for(String text : results) System.out.println(text);     //iterate through results & print

  System.out.println("\nCreate Map of text from first two columns:");
  Map<String, String> map = table.getTextFromColumns(0, 1);//create map containing text from cols 0 and 1
  for(String key : map.keySet()){                          //print keys (from col 0) and values (from col 1)
    System.out.println(key + ":" + map.get(key));
  }
}
catch(JauntException e){
  System.out.println(e);
}
On line 4, the target table is located using the tagQuery <table class=schedule>; the table Element is then passed into the constructor for a Table component. Note that the Document object provides a number of alternative ways exist to create a Table component in a single step, including Document.getTable(String tagQuery) and Document.getTableByText(String... regex).
As you peruse each data extraction method, note that several of them accept a regular expression for matching the text within a particular cell (td/th element). These regular expressions are matched in a case-insentive way against the inner text of the td/th elements (see Element.getTextContent()). Regular expressions are matched against text using Matcher.matches(), which performs whole-string matching as opposed to substring matching. In cases where there is more than one td/th that matches the regular expression, the first matching cell is used, where the table is processed row by row, left to right, top to bottom.
try{
  UserAgent userAgent = new UserAgent();
  userAgent.visit("http://jaunt-api.com/examples/schedule.htm");
  Table table = userAgent.doc.getTable("<table class=schedule>");   //get Table component via search query

  System.out.println("\nColumn having 'Mon':");
  Elements elements = table.getCol("mon");                                  //get entire column containing 'Mon'
  for(Element element : elements) System.out.println(element.outerHTML());  //iterate through & print elements

  System.out.println("\nColumn below 'Tue':");
  elements = table.getColBelow("tue");                                      //get column elements below 'Tue'
  for(Element element : elements) System.out.println(element.outerHTML());  //iterate through & print elements

  System.out.println("\nFirst row:");
  elements = table.getRow(0);                                               //get row at row index 0.
  for(Element element : elements) System.out.println(element.outerHTML());  //iterate through & print elements

  System.out.println("\nRow right of '2:00pm':");
  elements = table.getRowRightOf("2:00pm");                                 //get row elements right of 2:00pm
  for(Element element : elements) System.out.println(element.outerHTML());  //iterate through & print elements

  System.out.println("\nCell for fri at 10:00am:");
  Element element = table.getCell("fri", "10:00am");             //get element at intersection of col/row
  System.out.println(element.outerHTML());                       //print element

  System.out.println("\nCell at position 3,3:");
  element = table.getCell(3,3);                                  //get element at col index 3, row index 3
  System.out.println(element.outerHTML());                       //print element
}
catch(JauntException e){
  System.err.println(e);
}
On line 4, a table component is aquired via an element query (queries are covered in the examples on search methods). It can also be aquired by calling Document's getTable(int) method, which takes the table index as an argument (indexing starts at zero and refers to non-nested tables).
Several methods in this example accept a regular expression for matching the text within a particular cell (td/th element). These regular expressions are matched in a case-insentive way against the innerText() of the td/th elements. In cases where there is more than one td/th that matches the regular expression, the first encountered cell will constitute the match, where the table is processed row by row, left to right, top to bottom.
try{
  UserAgent userAgent = new UserAgent();
  userAgent.visit("https://google.com");                 //visit google.com
  userAgent.doc.apply("seashells").submit();             //apply search term and submit form

  Hyperlink nextPageLink = userAgent.doc.nextPageLink(); //get hyperlink to next page of results
  nextPageLink.follow();                                 //visit next page (p 2).
  System.out.println("location: " + userAgent.getLocation());  //print current location (url)
}
catch(JauntException e){
  System.err.println(e);
}
On line 3 the browser visits google.com, and on the following line a search for "seashells" is applied to the textfield and then submitted.
On line 6 the method nextPageLink() is invoked, which returns a Hyperlink object. The hyperlink object represents a link to the next page of results (page 2). On the next two lines, the browser follows the hyperlink and then prints the current location of the UserAgent.
See also the related methods Document.nextPageLink(Element) and Document.nextPageLinkExists().
try{
  UserAgent userAgent = new UserAgent();
  String url = "http://northernbushcraft.com";
  userAgent.setCacheEnabled(true);         //caching turned on
  userAgent.visit(url);                    //cache empty, so HTML page requested via http & saved in cache.
  userAgent.visit(url);                    //when revisiting, page pulled from filesystem cache - no http request.
  System.out.println(userAgent.response);  //response object shows that content was cached, no response headers

  userAgent.setCacheEnabled(false);        //caching turned off
  userAgent.visit(url);                    //page is once again retrieved via http request.
  System.out.println(userAgent.response);  //print response object, which now shows response headers
}
catch(JauntException e){
  System.err.println(e);
}
jaunt_cache, which is located in the directory specified by UserAgentSettings.outputPath (see Example 2 for accessing/altering settings).
The purpose of the HTML cache is to provide a means of accessing frequently-required HTML pages from local storage rather than repeatedly making HTTP requests. When screen-scraping data from a large website, it's common to run your program multiple times while refining/testing the scraping algorithm. By enabling caching, you can avoid repeatedly hitting the webserver, since the UserAgent will first check the cache to see whether the document is available locally.
To use the HTML cache you must first enable it, as seen on line 4. Disabling the cache (as seen on line 9) reverts the UserAgent to making HTTP requests rather than pulling content from the cache. However, disabling the cache does not delete the contents of the cache; the cache folder persists until it is manually deleted.